Archive for programming

The Big Shake-Out

Posted in Appsterdam, Caffeine, consulting, Context, livecoding, Naiad, Smalltalk, Spoon, SqueakJS with tags , , , , , , , , , , , , , , , , , on 25 March 2019 by Craig Latta
Golden Retriever shaking off water

Some of those methods were there for a very long time!

I have adapted the minimization technique from the Naiad module system to Caffeine, my integration of OpenSmalltalk with the Web and Node platforms. Now, from a client Squeak, Pharo, or Cuis system in a web browser, I can make an EditHistory connection to a history server Smalltalk system, remove via garbage collection every method not run since the client was started, and imprint needed methods from the server as the client continues to run.

This is a garbage collection technique that I had previously called “Dissolve”, but I think the details are easier to explain with a different metaphor: “shaking” loose and removing everything which isn’t attached to the system through usage. This is a form of dynamic dead code elimination. The technique has two phases: “fusing” methods that must not be removed, and “shaking” loose all the others, removing them. This has a cascading effect, as the literals of removed methods without additional references are also removed, and further objects without references are removed as well.

After unfused methods and their associated objects are removed, the subsystems that provided them are effectively unloaded. For the system to use that functionality again, the methods must be reloaded. This is possible using the Naiad module system. By connecting a client system to a history server before shaking, the client can reload missing methods from the server as they are needed. For example, if the Morphic UI subsystem is shaken away, and the user then attempts to use the UI, the parts of Morphic needed by the user’s interactions are reloaded as needed.

This technology is useful for delineating subsystems that were created without regard to modularity, and creating deployable modules for them. It’s also useful for creating minimal systems suited to a specific purpose. You can fuse all the methods run by the unit tests for an app, and shake away all the others, while retaining the ability to debug and extend the system.

how it works

Whether a method is fused or not is part of the state of the virtual machine running the system, and is reset when the virtual machine starts. On system resumption, no method is fused. Each method can be told to fuse itself manually, through a primitive interface. Otherwise, methods are fused by the virtual machine as they are run. A class called Shaker knows which methods in a typical system are essential for operation. A Shaker instance can ensure those methods are fused, then shake the system.

Shaking itself invokes a variant of the normal OpenSmalltalk garbage collector. It replaces each unfused method with a special method which, when run, knows how to install the original method from a connected history server. In effect, all unfused methods are replaced by a single method.

Reinstallation of a method uses Naiad behavior history metadata, obtained by remote messaging with a history server, to reconstruct the method and put it in the proper method dictionary. The process creates any necessary prerequisites, such as classes and shared pools. No compiler is needed, because methods are constructed from previously-generated instructions; source code is merely an optional annotation.

the benefits of livecoding all the way down

I developed the virtual machine support for this feature with Bert Freudenberg‘s SqueakJS virtual machine, making heavy use of the JavaScript debugger in a web browser. I was struck by how much faster this sort of work is with a completely livecoded environment, rather than the C-based environment in which we usually develop the virtual machine. It’s similar to the power of Squeak’s virtual machine simulator. The tools, living in JavaScript, aren’t as powerful as Smalltalk-based ones, but they operate on the final Squeak virtual machine, rather than a simulation that runs much more slowly. Rebuilding the virtual machine amounts to reloading the web page in which it runs, and takes a few seconds, rather than the ordeal of a C-based build.

Much of the work here involved trial and error. How does Shaker know which methods are essential for system operation? I found out directly, by seeing where the system broke after being shaken. One can deduce some of the answer; for example, it’s obvious that the methods used by method contexts of current processes should be fused. Most of the essential methods yet to run, however, are not obvious. It was only because I had an interactive virtual machine development environment that it was feasible to restart the system and modify the virtual machine as many times as I needed (many, many times!), in a reasonable timeframe. Being able to tweak the virtual machine in real time from Smalltalk was also indispensable for debugging and feature development.

I want to thank Bert again for his work on SqueakJS. Also, many thanks to Dan Ingalls and the rest of the Lively team for creating the environment in which SqueakJS was originally built.

release schedule

I’m preparing Shaker for the next seasonal release of Caffeine, on the first 2019 solstice, 21 June 2019. I’ll make the virtual machine changes available for all OpenSmalltalk host platforms, in addition to the Web and Node platforms that Caffeine uses via the SqueakJS virtual machine. There may be alpha and beta releases before then.

If this technology sounds interesting to you, please let me know. I’m interested in use cases for testing. Thanks!

Livecoding other tabs with the Chrome Remote Debugging Protocol

Posted in Appsterdam, consulting, Context, Smalltalk, SqueakJS with tags , , , , , , , on 24 July 2017 by Craig Latta

Chrome Debugging Protocol

We’ve seen how to use Caffeine to livecode the webpage in which we’re running. With its support for the Chrome Remote Debugging Protocol (CRDP), we can also use it to livecode every other page loaded in the web browser.

Some Help From the Inside

To make this work, we need to coordinate with the Chrome runtime engine. For CRDP, there are two ways of doing this. One is to communicate using a WebSocket connection; I wrote about this last year. This is useful when the CRDP client and target pages are running in two different web browsers (possibly on two different machines), but with the downside of starting the target web browser in a special way (so that it starts a conventional webserver).

The other way, possible when both the CRDP client and target pages are in the same web browser, is to use a Chrome extension. The extension can communicate with the client page over an internal port object, created by the chrome.runtime API, and expose the CRDP APIs. The web browser need not be started in a special way, it just needs to have the extension installed. I’ve published a Caffeine Helper extension, available on the Chrome Web Store. Once installed, the extension coordinates communication between Caffeine and the CRDP.

Attaching to a Tab

In Caffeine, we create a connection to the extension by creating an instance of CaffeineExtension:

CaffeineExtension new inspect

As far as Chrome is concerned, Caffeine is now a debugger, just like the built-in DevTools. (In fact, the DevTools do what they do by using the very same CRDP APIs; they’re just another JavaScript application, like Caffeine is.) Let’s open a webpage in another tab, for us to manipulate. The Google homepage makes for a familiar example. We can attach to it, from the inspector we just opened, by evaluating:

self attachToTabWithTitle: 'Google'

Changing Feelings

Now let’s change something on the page. We’ll change the text of the “I’m Feeling Lucky” button. We can get a reference to it with:

tabs onlyOne find: 'Feeling'

When we attached to the tab, the tabs instance variable of our CaffeineExtension object got an instance of ChromeTab added to it. ChromeTabs provide a unified message interface to all the CRDP APIs, also known as domains. The DOM domain has a search function, which we can use to find the “I’m Feeling Lucky” button. The CaffeineExtension>>find: method which uses that function answers a collection of search results objects. Each search result object is a proxy for a JavaScript DOM object in the Google page, an instance of the ChromeRemoteObject class.

In the picture above, you can see an inspector on a ChromeRemoteObject corresponding to the “I’m Feeling Lucky” button, an HTMLInputElement DOM object. Like the JSObjectProxies we use to communicate with JavaScript objects in our own page, ChromeRemoteObjects support normal Smalltalk messaging, making the JavaScript DOM objects in our attached page seem like local Smalltalk objects. We only need to know which messages to send. In this case, we send the messages of HTMLInputElement.

As with the JavaScript objects of our own page, instead of having to look up external documentation for messages, we can use subclasses of JSObject to document them. In this case, we can use an instance of the JSObject subclass HTMLInputElement. Its proxy instance variable will be our ChromeRemoteObject instead of a JSObjectProxy.

For the first message to our remote HTMLInputElement, we’ll change the button label text, by changing the element’s value property:

self at: #value put: 'I''m Feeling Happy'

The Potential for Dynamic Web Development

The change we made happens immediately, just as if we had done it from the Chrome DevTools console. We’re taking advantage of JavaScript’s inherent livecoding nature, from an environment which can be much more comfortable and powerful than DevTools. The form of web applications need not be static files, although that’s a convenient intermediate form for webservers to deliver. With generalized messaging connectivity to the DOM of every page in a web browser, and with other web browsers, we have a far more powerful editing medium. Web applications are dynamic media when people are using them, and they can be that way when we develop them, too.

What shall we do next?


browser-to-browser websocket tunnels with Caffeine and livecoded NodeJS

Posted in Appsterdam, consulting, Context, Smalltalk, SqueakJS with tags , , , , , , , , on 4 July 2017 by Craig Latta

network

In our previous look at livecoding NodeJS from Caffeine, we implemented tweetcoding. Now let’s try another exercise, creating WebSockets that tunnel between web browsers. This gives us a very simple version of peer-to-peer networking, similar to WebRTC.

Once again we’ll start with Caffeine running in a web browser, and a NodeJS server running the node-livecode package. Our approach will be to use the NodeJS server as a relay. Web browsers that want to establish a publicly-available server can register there, and browser that want to use such a server can connect there. We’ll implement the following node-livecode instructions:

  • initialize, to initialize the structures we’ll need for the other instructions
  • create server credential, which creates a credential that a server browser can use to register a WebSocket as a server
  • install server, which registers a WebSocket as a server
  • connect to server, which a client browser can use to connect to a registered server
  • forward to client, which forwards data from a server to a client
  • forward to server, which forwards data from a client to a server

In Smalltalk, we’ll make a subclass of NodeJSLivecodingClient called NodeJSTunnelingClient, and give it an overriding implementation of configureServerAt:withCredential:, for injecting new instructions into our NodeJS server:

configureServerAt: url withCredential: credential
  "Add JavaScript functions as protocol instructions to the
node-livecoding server at url, using the given credential."

  ^(super configureServerAt: url withCredential: credential)
    addInstruction: 'initialize'
    from: '
      function () {
        global.servers = []
        global.clients = []
        global.serverCredentials = []
        global.delimiter = ''', Delimiter, '''
        return ''initialized tunnel relay''}';
    invoke: 'initialize';
    addInstruction: 'create server credential'
    from: '
      function () {
        var credential = Math.floor(Math.random() * 10000)
        serverCredentials.push(credential)
        this.send((serverCredentials.length - 1) + '' '' + credential)
        return ''created server credential''}';
    addInstruction: 'install server'
    from: '
      function (serverID, credential) {
        if (serverCredentials[serverID] == credential) {
          servers[serverID] = this
          this.send(''1'')
          return ''installed server''}
      else {
        debugger;
        this.send(''0'')
        return ''bad credential''}}';
    addInstruction: 'connect to server'
    from: '
      function (serverID, port, req) {
        if (servers[serverID]) {
          clients.push(this)
          servers[serverID].send(''connected:atPort:for: '' + (clients.length - 1) + delimiter + port + delimiter + req.connection.remoteAddress.toString())
          this.send(''1'')
          return ''connected client''}
        else {
          this.send(''0'')
          return ''server not connected''}}';
    addInstruction: 'forward to client'
    from: '
      function (channel, data) {
        if (clients[channel]) {
          clients[channel].send(''from:data: '' + servers.indexOf(this) + delimiter + data)
          this.send(''1'')
          return ''sent data to client''}
        else {
          this.send(''0'')
          return ''no such client channel''}}';
    addInstruction: 'forward to server'
    from: '
      function (channel, data) {
        if (servers[channel]) {
          servers[channel].send(''from:data: '' + clients.indexOf(this) + delimiter + data)
          this.send(''1'')
          return (''sent data to server'')}
        else {
          this.send(''0'')
          return ''no such server channel''}}'

We’ll send that message immediately, configuring our NodeJS server:

NodeJSTunnelingClient
  configureServerAt: 'wss://yourserver:8087'
  withCredential: 'shared secret';
  closeConfigurator

On the NodeJS console, we see the following messages:

server: received command 'add instruction'
server: adding instruction 'initialize'
server: received command 'initialize'
server: evaluating added instruction 'initialize'
server: initialized tunnel relay
server: received command 'add instruction'
server: adding instruction 'create server credential'
server: received command 'add instruction'
server: adding instruction 'install server'
server: received command 'add instruction'
server: adding instruction 'connect to server'
server: received command 'add instruction'
server: adding instruction 'forward to client'
server: received command 'add instruction'
server: adding instruction 'forward to server'

Now our NodeJS server is a tunneling relay, and we can connect servers and clients through it. We’ll make a new ForwardingWebSocket class hierarchy:

Object
  ForwardingWebSocket
    ForwardingClientWebSocket
    ForwardingServerWebSocket

Instances of ForwardingClientWebSocket and ForwardingServerWebSocket use a NodeJSTunnelingClient to invoke our tunneling instructions.

We create a new ForwardingServerWebSocket with newThrough:, which requests new server credentials from the tunneling relay, and uses them to install a new server. Another new class, PeerToPeerWebSocket, provides the public message interface for the framework. There are two instantiation messages:

  • toPort:atServerWithID:throughURL: creates an outgoing client that uses a ForwardingClientWebSocket to connect to a server and exchange data
  • throughChannel:of: creates an incoming client that uses a ForwardingServerWebSocket to exchange data with a remote outgoing client.

Incoming clients are used by ForwardingServerWebSockets to represent their incoming connections. Each ForwardingServerWebSocket can provide services over a range of ports, as a normal IP server would. To connect, a client needs the websocket URL of the tunneling relay, a port, and the server ID assigned by the relay.

As usual, you can examine and try out this code by clearing your browser’s caches for caffeine.js.org (including IndexedDB), and visiting https://caffeine.js.org/. With browsers able to communicate directly, there are many interesting things we can build, including games, chat applications, and team development tools. What would you like to build?

retrofitting Squeak Morphic for the web

Posted in Appsterdam, consulting, Context, Smalltalk, Spoon, SqueakJS with tags , , , , , , , , on 30 June 2017 by Craig Latta

Google ChromeScreenSnapz022

Last time, we explored a way to improve SqueakJS UI responsiveness by replacing Squeak Morphic entirely, with morphic.js. Now let’s look at a technique that reuses all the Squeak Morphic code we already have.

many worlds, many canvases

Traditionally, Squeak Morphic has a single “world” where morphs draw themselves. To be a coherent GUI, Morphic must provide all the top-level effects we’ve come to expect, like dragging windows and redrawing them in their new positions, and redrawing occluded windows when they are brought to the top. Today, this comes at an acceptable but noticeable cost. Until WebAssembly changes the equation again, we want to do all we can to shift UI work from Squeak Morphic to the HTML5 environment hosting it. This will also make the experience of using SqueakJS components more consistent with that of the other elements on the page.

Just as we created an HTML5 canvas for morphic.js to use in the last post, we can do so for individual morphs. This means we’ll need a new Canvas subclass, called HTML5FormCanvas:

Object
  ...
    Canvas
       FormCanvas
         HTML5FormCanvas

An HTML5FormCanvas draws onto a Form, as instances of its parent class do, but instead of flushing damage rectangle from the Form onto the Display, it flushes them to an HTML5 canvas. This is enabled by a primitive I added to the SqueakJS virtual machine, which reuses the normal canvas drawing code path.

Accompanying HTML5FormCanvas are new subclasses of PasteUpMorph and WorldState:

Object
  Morph
    ...
      PasteUpMorph
        HTML5PasteUpMorph

Object
  WorldState
    HTML5WorldState

HTML5PasteUpMorph provides a message interface for other Smalltalk objects to create HTML5 worlds, and access the HMTL5FormCanvas of each world and the underlying HTML5 canvas DOM element. An HTML5WorldState works on behalf of an HTML5PasteUpMorph, to establish event handlers for the HTML5 canvas (such as for keyboard and mouse events).

HTML5 Morphic in action

You don’t need to know all of that just to create an HTML5 Morphic world. You only need to know about HTML5PasteUpMorph. In particular, (HTML5PasteUpMorph class)>>newWorld. All of the traditional Squeak Morphic tools can use HTML5PasteUpMorph as a drop-in replacement for the usual PasteUpMorph class.

There are two examples of single-window Morphic worlds in the current Caffeine release, for a workspace and classes browser. I consider these two tools to be the “hello world” exercise for UI framework experimentation, since you can use them to implement all the other tools.

We get an immediate benefit from the web browser handling window movement and clipping for us, with opaque window moves rendering at 60+ frames per second. We can also interleave Squeak Morphic windows with other DOM elements on the page, which enables a more natural workflow when creating hybrid webpages. We can also style our Squeak Morphic windows with CSS, as we would any other DOM element, since as far as the web browser is concerned they are just HTML5 canvases. This makes effects like the rounded corners and window buttons trays that Caffeine uses very easy.

Now, we have flexible access to the traditional Morphic tools while we progress with adapting them to new worlds like morphic.js. What shall we build next?

Pharo comes to Caffeine and SqueakJS

Posted in Appsterdam, consulting, Context, GLASS, Naiad, Seaside, Smalltalk, Spoon, SqueakJS with tags , , , , , , , , , on 29 June 2017 by Craig Latta

Google ChromeScreenSnapz025

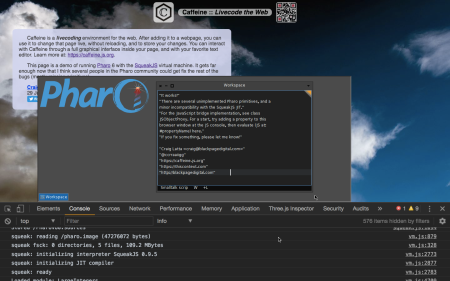
The Caffeine web livecoding project has added Pharo to the list of Smalltalk distributions it runs with SqueakJS. Bert Freudenberg and I spent some time getting SqueakJS to run Pharo at ESUG 2016 in Prague last summer, and it mostly worked. I think Bert got a lot further since then, because now there are just a few Pharo primitives that need implementing. All I’ve had to do so far this time is a minor fix to the input event loop and add the JavaScript bridge. The bridge now works from Pharo, and it’s the first time I’ve seen that.

Next steps include getting the Tether remote messaging protocol and Snowglobe app streaming working between Pharo and Squeak, all running in SqueakJS. Of course, I’d like to see fluid code-sharing of all kinds between Squeak, Pharo, and all the other Smalltalk implementations.

So, let the bugfixing begin! :)  You can run it at https://caffeine.js.org/pharo/. Please do get in touch if you find and fix things. Thanks!

a faster Morphic with morphic.js

Posted in Appsterdam, consulting, Context, Naiad, Smalltalk, Spoon, SqueakJS with tags , , , , , , , , , , on 28 June 2017 by Craig Latta

Google ChromeScreenSnapz017

Caffeine is powered by SqueakJS. The performance of SqueakJS is amazingly good, thanks in large part to its dynamic translation of Smalltalk compiled methods to JavaScript functions (which are in turn translated to machine code by your web browser’s JS engine). In the HTML5 environment where SqueakJS finds itself, there are several other tactics we can use to further improve user interface performance.

Delegate!

In a useful twist of fate, SqueakJS emerges into a GUI ecosystem descended from Smalltalk, now brimming with JavaScript frameworks to which SqueakJS can delegate much of its work. To make Caffeine an attractive environment for live exploration, I’m addressing each distraction I see.

The most prominent one is user interface responsiveness. SqueakJS is quite usable, even with large object memories, but its Morphic UI hasn’t reached the level of snappiness that we expect from today’s web apps. Squeak is a virtual machine, cranking away to support what is essentially an entire operating system, with a process scheduler, window system, compiler, and many other facilities. Since, with SqueakJS, that OS has access to a multitude of similar behavior in the JavaScript world, we should take advantage.

Of course, the UI design goals of the web are different than those of other operating systems. Today’s web apps are still firmly rooted in the web’s original “page” metaphor. “Single Page Applications” that scroll down for meters are the norm. While there are many frameworks for building SPAs, support for open-ended GUIs is uncommon. There are a few, though; one very good one is morphic.js.

morphic.js

Morphic.js is the work of Jens Mönig, and part of the Snap! project at UC Berkeley, a Scratch-like environment which teaches advanced computer science concepts. It’s a standalone JavaScript implementation of the Morphic UI framework. By using morphic.js, Squeak can save its cycles for other things, interacting with it only when necessary.

To use morphic.js in Caffeine, we need to give morphic.js an HTML5 canvas for drawing. The Webpage class can create new DOM elements, and use jQuery UI to give them effects like dragging and rotation. With one line we create a draggable canvas with window decorations:

canvas := Webpage createWindowOfKind: 'MorphicJS'

Now, after loading morphic.js, we can create a morphic.js WorldMorph object that uses the canvas:

world := (JS top at: #WorldMorph) newWithParameters: {canvas. false}

Finally, we need to create a rendering loop that regularly gets the world to draw itself on the canvas:

(JS top)
  at: #world
  put: world;
  at: #morphicJSRenderingLoop
  put: (
    (JS Function) new: '
      requestAnimationFrame(morphicJSRenderingLoop)
      world.doOneCycle()').

JS top morphicJSRenderingLoop

Now we have an empty morphic.js world to play with. The first thing to know about morphic.js is that you can get a world menu by control-clicking:

Google ChromeScreenSnapz018

Things are a lot more interesting if you choose development mode:

Google ChromeScreenSnapz019.png

Take some time to play around with the world menu, creating some morphs and modifying them. Note that you can also control-click on morphs to get morph-specific menus, and that you can inspect any morph.

Google ChromeScreenSnapz020.png

Also notice that this user interface is noticeably snappier than the current SqueakJS Morphic. MorphicJS isn’t trying to do all of the OS-level stuff that Squeak does, it’s just animating morphs, using a rendering loop that is runs as machine code in your web browser’s JavaScript engine.

Smalltalk tools in another world, with Hex

The inspector gives us an example of a useful morphic.js tool. Since we can pass Smalltalk blocks to JavaScript as callback functions, we have two-way communication between Smalltalk and JavaScript, and we can build morphic.js tools that mimic the traditional Squeak tools.

I’ve built two such tools so far, a workspace and a classes browser. You can try them out with these expressions:

HexMorphicJSWorkspace open.
HexMorphicJSClassesBrowser open

“Hex” refers to a user interface framework I wrote called Hex, which aggregates several JavaScript UI frameworks. HexMorphicJSWorkspace and HexMorphicJSClassesBrowser are subclasses of HexMorphicJSWindow. Each instance of every subclass of HexMorphicJSWindow can be used either as a standalone morphic.js window, or as a component in a more complex window. This is the case with these first two tools; a HexMorphicJSClassesBrowser uses a HexMorphicJSWorkspace as a pane for live code evaluation, and you can also use a HexMorphicJSWorkspace by itself as a workspace.

With a small amount of work, we get much snappier versions of the traditional Smalltalk tools. When using them, SqueakJS only has to do work when the tools request information from them. For example, when a workspace wants to print the result of evaluating some Smalltalk code, it asks SqueakJS to compile and evaluate it.

coming up…

It would be a shame not to reuse all the UI construction effort that went into the original Squeak Morphic tools, though. What if we were to put each Morphic window onto its own canvas, so that SqueakJS didn’t have to support moving windows, clipping and so on? Perhaps just doing that would yield a performance improvement. I’ll write about that next time.

Backend Caffeine with Node.js and Tweetcoding

Posted in Appsterdam, consulting, Context, Smalltalk, Spoon, SqueakJS with tags , , , , , , on 27 June 2017 by Craig Latta

tweetcodingWe’ve seen a couple of examples of frontend Caffeine development, using jQuery UI and voxel.js. Let’s look at something on the backend, using Node.js and something I like to call tweetcoding.

Social Livecoding

Livecoding means having all the capabilities of your development environment while your system is live. Runtime is all the time. Smalltalk programmers have always enjoyed this way of working. It is particularly effective in domains such as music performance, where the ability to make changes while your system is running is critical, both for fixing bugs and for artistic expression. One of my artistic goals with musical livecoding (writing code that makes live music for an audience) is audience accessibility. I want the audience to have some understanding of what’s going on in my code, even if they aren’t coders (yet).

Another aspect I like to incorporate is audience participation. If the audience actually does understand what I’m doing in my code, why not let them join in? Social media has become a ubiquitous communication platform; billions of people are using it with prose and pictures. I think the time has come to use it with live code as well. Nearly everyone in the audience has a powerful computer with social media access in a pocket. We can all livecode together.

Let’s Do This

We need three things to make this happen: a way for people to submit code, something that listens for that code and evaluates it, and a shared artifact everyone can see that shows the code’s effects. I like Twitter as a coding medium, for its minimalism. It also has a culture of hashtag use, and a streaming API, which make listening for code straightforward. For the shared artifact, we can use something viewed with Caffeine in a web browser.

For our first example, let’s use something simple for our coding domain, like turtle graphics. A person can tweet instructions to a turtle which draws on a square piece of paper, 100 units on a side. There are four commands:

  • color, for the turtle to change its pen for one of the given color
  • down, for the turtle to put its pen down on the paper
  • rotate, for the turtle to change direction
  • move, for the turtle to move some distance
  • up, for the turtle to take its pen up from the paper

We’ll say that that the turtle can be identified by some ID, and is initially at the center of the paper. A tweetcoded instruction for the turtle might look like:

FranzScreenSnapz002

Tweetcoding tweets start with the #tweetcoding hashtag, so people seeing one for the first time can look at others with that hashtag, to see what it’s about. This is followed by hashtags identifying our turtle-graphics protocol, and the turtle we’re using. We end the tweet with a drawing instruction, using our instruction set above.

Livecoding NodeJS

To detect these tweets, we’ll use the Twitter streaming API from Node.js. In the spirit of livecoding, we won’t use an application-specific Node.js module for this directly, but instead inject JavaScript code live into a Node.js instance, from Caffeine in a web browser. I’ve written a node-livecode Node.js module which takes commands over a websocket. It starts with three instructions:

  • require, for loading another Node.js module into itself with npm
  • add instruction, for adding an instruction to itself
  • eval, for evaluating JavaScript code

You can see the implementation at GitHub. It can use SSL to keep injected code secure in transit, so you may want to set up a certificate for your server with Let’s Encrypt. Also note that it exposes the listening server as a global variable, so that you can use it in your injected code.

Once we have node-livecode on a server listening for commands, we can inject code into it from Caffeine. First we’ll inject code to listen to #tweetcoding tweets from Twitter:

| websocket |

websocket := JS WebSocket newWithParameters: {'wss://yourserver:port'}.
JS top at: #websocket put:websocket.

websocket
  at: #onmessage
  put: [:message |
    Transcript
      cr;
      nextPutAll: message data asString;
      endEntry];
  at: #onopen
  put: (
    (JS Function) new: '
      window.top.ws.send(JSON.stringify({
        credential: ''shared secret'',
        verb: ''require'',
        parameters: {
          package: ''node-tweet-stream'',
          then: ''
            var Twitter = require(''node-tweet-stream'')
              , twitter = new Twitter({
                  consumer_key: '''',
                  consumer_secret: '''',
                  token: '''',
                  token_secret: ''''})

            twitter.on(
              ''tweet'',
              function (tweet) {
                if (instructions[''broadcast'']) {
                  instructions[''broadcast''](tweet)}}

            twitter.on(
              ''error'',
              function (err) {
                console.log(''error in uploaded code'')})

            twitter.track(''#tweetcoding #turtlegraphics '')''}})))

The example above uses handwritten JavaScript code, but we could also use Caffeine’s JavaScript code generation to produce it from Smalltalk code (see the method MethodNode>>javaScript for the implementation). Also, since we’ll be injecting several things, it would be nice to have a more compact way of writing it. Let’s move that workspace code to a class.

Next we’ll inject a new instruction, for initializing a set of drawing-command listeners:

| client |

client := (
  NodeJSLivecodingClient
    at: 'wss://yourserver:port'
    withCredential: 'shared secret').

client
  addInstruction: 'initialize listeners'
  from: '
    function () {
      global.listeners = []
      return ''initialized listeners''}'

To round out our tweetcoding protocol, we’ll add instructions for accepting listeners, and broadcasting tweets detected from Twitter:

client
  addInstruction: 'start listening'
  from: '
    function () {
      listeners.push(this)
      return ''added listener''}'
  addInstruction: 'stop listening'
  from: '
    function () {
      listeners.splice(listeners.indexOf(this), 1);
      return ''removed listener''}'
  addInstruction: 'broadcast'
  from: '
    function (payload) {
      listeners.forEach(
        function (listener) {listener.send(payload)})
      return ''broadcasted''}'

Putting It All Together

Now we can write other Smalltalk classes which subscribe to tracked tweets from the server, and collaborate to do something interesting with them in the web browser. I’ve implemented the following classes:

Object
  NodeJSLivecodingClient
    TweetcodingClient
      TurtleGraphicsTweetcodingClient
  Turtle
  Tweet

Instances of NodeJSLivecodingClient can inject code into a node-livecoding server, and invoke code added by other clients. Instances of TweetcodingClient can also set tracking filters for tweets, and process matching tweets when they occur. Instances of TurtleGraphicsTweetcodingClient can also control Turtles, which can draw on canvases in Caffeine windows. Instances of Tweet bundle up the text and metadata of tweets. For the implementation, clear your browser’s cache for caffeine.js.org (including IndexedDB), and reload https://caffeine.js.org/.

I’m also running a node-livecoding server injected with turtle-graphics tweetcoding code, at wss://frankfurt.demo.blackpagedigital.com:8087/. Once you get connected (and tweets are flowing), you might see something like this:

Google ChromeScreenSnapz014

After developing this system, I’ve realized I don’t really need to run SqueakJS from within NodeJS; just injecting code into it is fine. There are many possibilities here. :)

Have fun, and please let me know what you think!


Caffeine in 3D with voxel.js

Posted in Appsterdam, consulting, Context, Naiad, Smalltalk, Spoon, SqueakJS with tags , , , , , , , on 24 June 2017 by Craig Latta

voxel.js in CaffeineSince Caffeine is powered by SqueakJS, you can create mashups with any other JavaScript frameworks you like. Let’s take a simple look at 3D graphics using voxel.js, an open-source voxel game building toolkit.

hello blocks

Following the “hello world” example at voxeljs.com, we generate a simple Minecraft-like blocks world in which we can walk around and dig (you can visit it here). The example gives us a JavaScript file, builtgame.js, that we can also use from Caffeine.

As generated, builtgame.js evaluates its createGame function at load time. This creates an HTML5 canvas, initializes WebGL, and begins the game when the hosting page is loaded. We want to save those steps for SqueakJS to initiate, and we also want to use a canvas of our own, in a Caffeine window.

hooks for Caffeine

We can achieve the first part by changing builtgame.js so that it just puts createGame somewhere SqueakJS can get to it, instead of evaluating it. We can create a property on the browser DOM window for this:

window.game = createGame;

Normally we would edit the source projects from which builtgame.js is generated, rather than builtgame.js directly (properly forking the corresponding repositories), but for this example we’ll just go ahead.

Voxel.js uses the three.js framework as its WebGL interface. The three.js WebGL renderer accepts an HTML5 canvas parameter for its initialization function. The second change we’ll make to builtgame.js is to pass a canvas set by SqueakJS in another window property:

View.prototype.createRenderer = function() {
  this.renderer = new THREE.WebGLRenderer({
    canvas: window.gameCanvas !== undefined ? window.gameCanvas : undefined,
    antialias: true});
  this.renderer.setSize(this.width, this.height);
  this.renderer.setClearColorHex(this.skyColor, 1.0);
  this.renderer.clear();};

Finally, we’ll change the game rendering initialization function, to save a reference to the voxel.js renderer’s event emitter, so that we can tell it to pause from SqueakJS:

Game.prototype.initializeRendering = function(opts) {
  var self = this;
  if (!opts.statsDisabled) self.addStats();
  window.addEventListener('resize', self.onWindowResize.bind(self), false);
  self.ee = (
    requestAnimationFrame(window).on(
      'data',
      function(dt) {
        self.emit('prerender', dt);
        self.render(dt);
        self.emit('postrender', dt);
      });
  if (typeof stats !== 'undefined') {
    self.on(
      'postrender',
      function() {
        stats.update();});}}

on the Smalltalk side

Now, in SqueakJS, we can create a VoxelJS class:

Object
  subclass: #VoxelJS
  instanceVariableNames: ''
  classVariableNames: ''
  poolDictionaries: ''
  category: 'Hex-HTML5-WebGL-VoxelJS'.

VoxelJS class instanceVariableNames: 'game'

We’ll give it a class-side method to load and initialize voxel.js, with a Caffeine window and canvas for it to use:

initialize

| canvas |

Webpage current loadScriptFrom: 'js/voxeljs/builtgame.js'.
canvas := Webpage createWorldOfKind: 'voxeljs'.
canvas styleAt: #borderRadius put: '10px'.

(Webpage current)
  windowizeElementNamed: canvas window id
  closingWith: [
    self pause.
    Webpage current top at: #gameCanvas put: nil].

canvas window dragWith: canvas window windowButtonsTray moveButton.
game := (
  (Webpage current top)
    at: #gameCanvas put: canvas;
    game: {#container -> canvas window})

We’ll also add a method for pausing the voxel.js renderer, using the ee property we added to the game rendering initialization in builtgame.js:

pause
  game ee pause.
  (JQuery at: #fps) element remove

In a workspace, we send our initialization message:

VoxelJS initialize

Now we have our first voxel world, running in a Caffeine window that we can easily close, rather than the whole screen. If you clear your browser cache (including IndexedDB) for caffeine.js.org, you can reload the Caffeine page to see this code in action.

Please let me know if you get this far!


Caffeine :: Livecode the Web!

Posted in Appsterdam, consulting, Context, Naiad, Smalltalk, Spoon, SqueakJS with tags , , , , , , , , , , , , , , on 22 June 2017 by Craig Latta

CaffeineFor the impatient… here it is.

Back to the Future, Again

With the arrival of Bert Freudenberg’s SqueakJS, it was finally time for me to revisit the weird and wonderful world of JavaScript and web development. My previous experiences with it, in my consulting work, were marked by awkward development tools, chaotic frameworks, and scattered documentation. Since I ultimately rely on debuggers to make sense of things, my first question when evaluating a development environment is “What is debugging like?”

Since I’m a livecoder, I want my debugger to run in the web browser I’m using to view the site I’m debugging. The best in-browser debugger I’ve found, Chrome DevTools (CDT), is decent if you’re used to a command-line interface, but lacking as a GUI. With Smalltalk, I can open new windows to inspect objects, and keep them around as those objects evolve. CDT has an object explorer integrated into its read-eval-print loop (REPL), and a separate tab for inspecting DOM trees, but using them extensively means a lot of scrolling in the REPL (since asynchronous console messages show up there as well) and switching between tabs. CDT can fit compactly onto the screen with the subject website, but doesn’t make good use of real estate when it has more. This interrupts the flow of debugging and slows down development.

The Pieces Are All Here

With SqueakJS, and its JavaScript bridge, we can make something better. We can make an in-browser development environment that compares favorably with external environments like WebStorm. I started from a page like try.squeak.org. The first thing we need is a way to move the main SqueakJS HTML5 canvas around the page. I found jQuery UI to be good for this, with its “draggable” effect. While we’re at it, we can also put each of Squeak‘s Morphic windows onto a separate draggable canvas. This moves a lot of the computation burden from SqueakJS to the web browser, since SqueakJS no longer has to do window management. This is a big deal, since Morphic window management is the main thing making modern Squeak UIs feel slow in SqueakJS today.

SqueakJS provides a basic proxy class for JavaScript objects, called JSObjectProxy. Caffeine has an additional proxy class called JSObject, which provides additional reflection features, like enumerating the subject JS object’s properties. It’s also a good place for documenting the behavior of the JS objects you’re using. Rather than always hunting down the docs for HTMLCanvasElement.getContext on MDN, you can summarize things in a normal method comment, in your HTMLCanvasElement class in Smalltalk.

Multiple Worlds

With a basic window system based on HTML5 canvases, we can draw whatever we like on those canvases, using the SqueakJS bridge and whatever other JS frameworks we care to load. I’ve started integrating a few frameworks, including React (for single-page-app development), three.js (for WebGL 3D graphics development), and morphic.js (a standalone implementation of Morphic which is faster than what’s currently in Squeak). I’ll write about using them from Caffeine in future blog posts.

Another framework I’ve integrated into Caffeine is Snowglobe (for Smalltalk app streaming and other remote GUI access), which I wrote about here previously. I think the Snowglobe demo is a lot more compelling when run from Caffeine, since it can co-exist with other web apps in the same page. You can also run multiple Snowglobes easily, and drag things between them. I’ll write more about that, too.

Fitting Into the JavaScript Ecosystem

To get the full-featured debugger UI I wanted, I wrote a Chrome extension called Caffeine Helper, currently available on the Chrome Web Store. It exposes the Chrome Debugging Protocol (CDP) support in the web browser to SqueakJS, letting it do whatever the CDT can do (CDT, like SqueakJS, is just another JavaScript-powered web app). The support for CDP that I wrote about previously uses a WebSocket-based CDP API that requires Chrome to be started in a special way. The Caffeine Helper extension provides a JavaScript API, without that requirement.

I also wrote support for generating Smalltalk code from JavaScript, using the esprima parsing framework, and vice-versa. With my debugger and code generation, I’m going to try developing for some file-based JS projects, using Smalltalk behind the scenes and converting to and from JavaScript when necessary. I think JS web development might actually not drive me crazy this way. :)

Please Try It Out!

So, please check out Caffeine, at caffeine.js.org! I would very much appreciate your feedback. I’m particularly interested to hear your use cases, as I plan the next development steps. I would love to have collaborators, too. Let’s build!

App streaming with Snowglobe

Posted in Appsterdam, consulting, Context, Naiad, Smalltalk, Spoon with tags , , , , , , , , on 31 October 2016 by Craig Latta

Now that we’ve seen how to run Smalltalk in a web browser, clone web Smalltalk as a desktop app, and send remote messages between Smalltalks, let’s look at an application of these technologies.

app streaming

App streaming is a way of delivering the user experience of an app without actually running the app on the user’s machine. The name is an allusion to music and video streaming; you get to experience the asset immediately, without waiting for it to download completely. Streaming an app also has the benefit of avoiding installation, something which can be problematic to do (and to undo). This is nice when you just want to demo an app, before deciding to install it.

Another advantage of app streaming is that the app can run on a much faster machine than the user’s, or even on a network of machines. Social networks are a crude example of app streaming; there are massive backends working behind your web browser, crunching away on all that graph data. Typically, though, app streaming involves an explicit visual component, with the user’s display and input devices standing in for the normal ones. The goal is to make using a new app as simple as playing an online video.

distributing Smalltalk user interface components

Everything in Smalltalk happens by objects sending messages to each other. With a remote messaging framework like Tether, we can put some of the objects in a user interface on a remote machine. Snowglobe is an adaptation of Squeak‘s Morphic user interface framework which runs Squeak on a server, but uses SqueakJS in a client web browser as the display. This is an easy way to recast a Smalltalk application as a web app, while retaining the processing speed and host platform access of the original.

Morphic is built around a display loop, where drawable components (morphs) are “stepped” at some frequency, like a flipbook animation. Normally, drawing is done on a single morph that corresponds to the display of the machine where Squeak is running. Snowglobe adds a second display morph which is Tether-aware. When drawing to this tethered display morph, the app server translates every display operation into a compact remote message.

To maximize speed, Morphic already tries to do its drawing with as few operations as possible (e.g., avoiding unnecessary redrawing). This is especially important when display operations become remote, since network transmission is orders of magnitude slower than local drawing. Since the tethered display morph also lives in a Smalltalk object memory, we can optimize drawing operations involving graphics that are known to both sides of the connection. For example, when changing the mouse cursor to a resize icon when hovering over the corner of a window, there’s no need to send the icon over the wire, since the displaying system already has it. Instead, we can send a much smaller message requesting that the icon be shown.

For full interaction, we also need to handle user input events going back the other way. Snowglobe co-opts Morphic’s user input handling as well. With user input and display forwarded appropriately together, we achieve the seamless illusion that our app is running locally, either as a single morph amongst other local morphs, or using the entire screen.

going beyond screen-sharing

Protocols like VNC do the remote display and user input handling we’ve discussed, although they are typically more complicated to start than clicking a link in a web browser. But since both systems in a Snowglobe session are Smalltalk, we can go beyond simple screen sharing. We can use Tether to send any remote messages we want, so either side can modify the app-streaming behavior in response to user actions. For example, the user might decide to go full-screen in the web browser displaying the app, prompting SqueakJS to notify the remote app, which could change the way the app displays itself.

try it for yourself

I’ve set up an AWS server running the Squeak IDE, reachable from SqueakJS in your web browser. Be gentle… there’s only one instance running (actually two, one in Europe and one in North America, chosen for you automatically by Amazon). Please check it out and let me know what you think!