
The Model Context Protocol gives us a way to extend the skills of an LLM, by associating a local function with natural-language descriptions of what it does, and making that tool available as additional conversational context. Once the model can infer from conversation that a tool should be used, it invokes the tool’s function via the protocol. Tools are made available by an MCP server, augmenting models with comprehensive sets of related skills. There are MCP servers for filesystem access, image processing, and many other domains. New registries are emerging to provide MCP server discovery, and old ones (like npm) are becoming good sources as well.
For someone who can create the underlying tool functions, a personal MCP server can supercharge a coding assistant with project-specific skills. I’ve added an MCP server proxy to my Caffeine server bridge, enabling a Smalltalk IDE running in a web browser to act as an MCP server, and enhancing the AI conversations that one may have in the IDE. I can dynamically add tools, either through conversation or in Smalltalk code directly.
anatomy of an MCP tool
In modeling an MCP tool, we need to satisfy the denotational requirements of both the protocol (to enable model inference) and the environment in which the functions run (to enable correct function invocation). For the protocol, we must provide a tool name and description, and schemas for the parameters and the result. For the Smalltalk environment, we need the means to derive, from invocation data, the components of a message: a receiver, selector, and parameters.
In my implementation, an instance of class FunctionAITool has a name, description, result, parameters, selector, and a receiver computation. The receiver computation is a closure which answers the intended receiver. Each of the parameters is an instance of class FunctionAIToolParameter, which also has a name and description, as well as a type, a boolean indicating whether it is required, and a parameter computation similar to the receiver computation. The tool’s result is also a FunctionAIToolResult, which can have a result computation but typically doesn’t, since the computation is usually done by the receiver performing the selector with the parameters. The result computation can be used for more complex behavior, extending beyond a single statically-defined method.
The types of the result and each parameter are usually derived automatically from pragmas in the method of the receiver named by the selector. (The developer can also provide the types manually.) These pragmas provide type annotations similar to those used in generating the WebAssembly version of the Smalltalk virtual machine. The types themselves come from the JSON Schema standard.
routing MCP requests from the model to the environment
Caffeine is powered by SqueakJS, Vanessa Freudenberg’s Smalltalk virtual machine in JavaScript. In a web browser, there’s no built-in way to accept incoming network connections. Using Deno integration I wrote, a server script acts as a proxy for any number of remote peers with server behavior, connected via websockets. In the case of MCP, the script can service some requests itself (for example, during the initialization phase). The script also speaks Caffeine’s Tether remote object messaging protocol, so it can forward client requests to a remote browser-based Caffeine instance using remote messages. That Caffeine instance can service requests for the tools list, and for tool calls. The server script creates streaming SSE connections, so that both client and server can stream notifications to each other over a persistent connection.
Caffeine creates its response to a tools list request by asking each tool object to answer its metadata in JSON, and aggregating the responses. To service a tool call, if the tool has a selector, it uses the receiver computation to get a receiver, and the parameter computations to both validate each client-provided parameter and derive an appropriate Smalltalk object for it. Now the receiver can perform the tool’s selector with the parameters. If the tool has a result computation instead of a selector, the tool will evaluate it with the derived parameters. A tool’s result can be of a simple JSON type, or something more sophisticated like a Smalltalk object ID, for use as an object reference parameter in a future tool call.
conversational tool reflection
For simple tools, it’s sometimes useful to keep development entirely within a conversation, without having to bring up traditional Smalltalk development tools at all. There’s not much motivation for this when the conversation is in a Smalltalk IDE, where conversations can happen anywhere one may enter text, and the Smalltalk tools are open anyway. But it can transform a traditional chatbot interface.
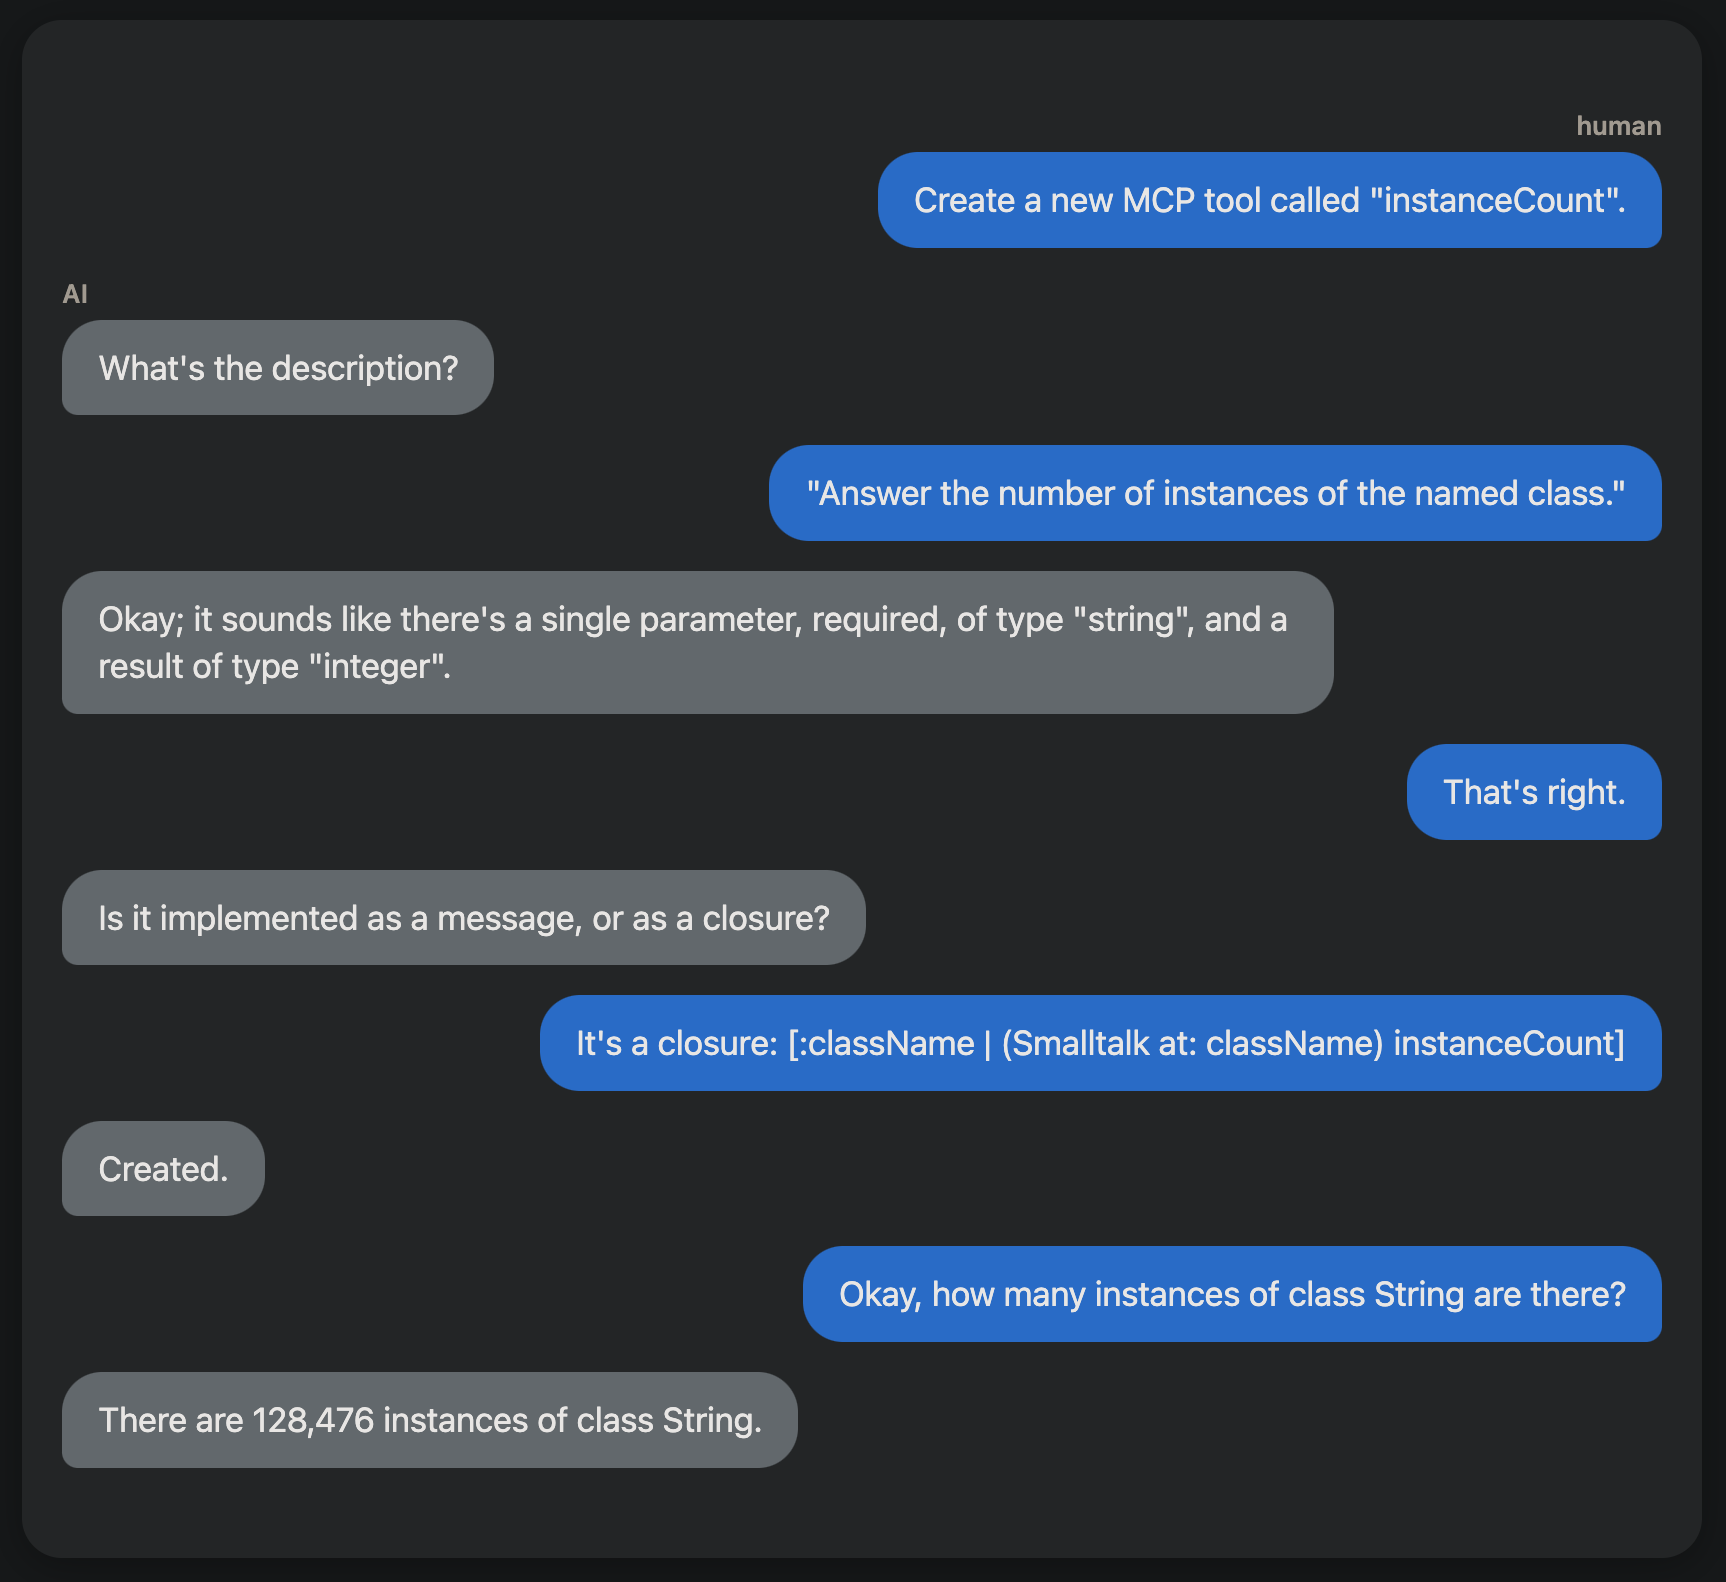
This extends to the development of the tools themselves. I’ve developed a tool that can create and edit new tools. I imagine conversations like this one:
What would you do with it?
This capability could enable useful Smalltalk coding assistants. I’m especially keen to see how we might create tools for helping with debugging. What would you do?


